


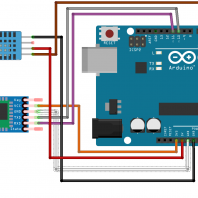
I have brought a arduino kit in 2016 but haven’t played with it. Finally have some taste on it. Install sketch – official software from arduino Add “Adafruit unified sensor” & SimpleDHT library in sketch, then create a new file. Code
|
1 2 3 4 5 6 7 8 9 10 11 12 13 14 15 16 17 18 19 20 21 22 23 24 25 26 27 28 29 30 31 32 33 34 35 36 37 38 39 40 41 42 43 44 45 46 47 48 49 50 51 52 53 54 55 56 57 58 59 60 61 62 63 64 65 66 67 68 69 70 71 72 73 74 75 76 77 78 79 80 81 82 |
/* install "Adafruit unified sensor" and simpleDHT library in sketch */ #include <Adafruit_Sensor.h> #include <DHT.h> /* Include the software serial port library */ #include <SoftwareSerial.h> /* to communicate with the Bluetooth module's TXD pin */ #define BT_SERIAL_TX 10 /* to communicate with the Bluetooth module's RXD pin */ #define BT_SERIAL_RX 11 /* Initialise the software serial port */ SoftwareSerial BluetoothSerial(BT_SERIAL_TX, BT_SERIAL_RX); /* what digital pin DHT connected to */ #define DHTPIN 7 // Uncomment whatever type you're using! #define DHTTYPE DHT11 // DHT 11 //#define DHTTYPE DHT22 // DHT 22 (AM2302), AM2321 //#define DHTTYPE DHT21 // DHT 21 (AM2301) DHT dht(DHTPIN, DHTTYPE); void setup() { Serial.begin(9600); Serial.println("Temperature and Humidity to bluetooth"); dht.begin(); BluetoothSerial.begin(9600); delay(1000); // Should respond with OK BluetoothSerial.print("AT"); waitForResponse(); // Should respond with its version BluetoothSerial.print("AT+VERSION"); waitForResponse(); // Set pin to 1234 BluetoothSerial.print("AT+PIN1234"); waitForResponse(); // Set the name to BLU BluetoothSerial.print("AT+NAMEBLU"); waitForResponse(); Serial.println("Finished setup!"); } void loop() { // Give it time to calibrate delay(10000); float h = dht.readHumidity(); // Read Celsius float t = dht.readTemperature(); // Read Fahrenheit (isFahrenheit = true) float f = dht.readTemperature(true); // Check errors if (isnan(h) || isnan(t) || isnan(f)) { Serial.println("Failed to read from DHT sensor!"); return; } // Compute heat index in Fahrenheit (the default) // float hif = dht.computeHeatIndex(f, h); // Compute heat index in Celsius (isFahreheit = false) // float hic = dht.computeHeatIndex(t, h, false); Serial.println("Humidity: " + String(h) + "%, Temperature: " + String(t) + "^C"); BluetoothSerial.println("Humidity: " + String(h) + "%, Temperature: " + String(t) + "^C"); } // Function to pass BlueTooth output through to serial port output void waitForResponse() { delay(1000); while (BluetoothSerial.available()) { Serial.write(BluetoothSerial.read()); } Serial.write("\n"); } |
Verify code, then connect the Ardunio board, and upload the file. If it failed to upload, disconnect the bluetooth module. sending/receiving bluetooth data may interrupt the code upload. Now let’s see the value from receiver via bluetooth, the simplest way to connect a android phone. Pair it up by bluetooth, install a terminal app, e.g. Bluetooth Terminal HC-05. (blueTerm does not work for my old GS3) value will display on screen: Connections: reference: Arduino Bluetooth Wireless Communication http://www.instructables.com/id/ArduinoAndroid-Bluetooth-HC-06-Module-DHT11-Temp-M/
headless setup according to https://core-electronics.com.au/tutorials/raspberry-pi-zerow-headless-wifi-setup.html unfortunately it does not work for me, there is no IP address assigned in router info page. Connect Pi Zero W with HDMI and USB keyboard. I don’t have mini-USB to USB converter, surprisingly the OTG converter works. $ sudo vim.tiny /etc/wpa_supplicant/wpa_supplicant.conf
|
1 2 3 4 5 6 7 8 9 10 11 12 13 14 15 16 17 |
ctrl_interface=DIR=/var/run/wpa_supplicant GROUP=netdev update_config=1 country=AU # Home Network network={ ssid="SSID1" psk="password1" key_mgmt=WPA-PSK } # Office Network network={ ssid="SSID2" psk="password2" key_mgmt=WPA-PSK } |
Since default locale is en_GB, the keyboard cannot type “|” in shell…… type $ sudo rasp-config to re-config locale and $ sudo dpkg-reconfigure keyboard-layout , then $ sudo reboot

Infamous Seagate Barracuda 3TB hard disk suddenly dead. Due to physical/raw disk mapping, DSM on ESXi cannot do S.M.A.R.T. test and ESXi does not alert as well…. Anyway, this time forget about ESXi, just install DSM 6.1. Planning to use docker for other applications in future. For information to install, follow 2 links below https://xpenology.com/forum/topic/7973-tutorial-installmigrate-dsm-52-to-61x-juns-loader/ https://github.com/XPEnology/JunLoader/wiki/Installing-DSM-6.0-Bare-Metal Some additional notes: VID:PID
|
1 2 |
$ sudo lsusb Bus 001 Device 003: ID 0781:5576 SanDisk Corp. Cruzer Facet |
instead of OSFMount(Windows), edit grub.cfg by linux vm.
|
1 2 3 4 5 6 |
cd /mnt/hgfs/vmshare sudo fdisk -l synoboot.img ## 512 (secotr size?) * 2048 (start) = 1048576 sudo mount -o rw,loop,offset=1048576 ./synoboot.img /mnt/synoimg vim /mnt/synoimg/grub/grub.cfg umount /mnt/synoimg |
HP MicroServer Gen8 has 2 NIC, so put to MAC addresses to grub.cfg as well After installation completed, go to HP PS1810 switch webpage, Trunks > Trunk Configuration select “LCAP Active” and 2 ports for bonding In DSM, control panel > networking > Network interface > create “bond”, select IEEE 8022.3ad Dynamic link aggregation.